Passive Solar Home
Over the past 2 and a half months, our STEM class has been learning about a passive solar home. There were many steps to this massive project. I will briefly describe each one as you read. I could not have asked for a better group for this long project. My group bonded over the course of this project and knocked it out. We were very happy with our end result. Here are all the steps we followed.
1. Atomic Structure, state and heat.
2. Design a hot water heater
3. Solar angles and how they change
4. Day lighting design activity
5. Site selection
6. Materials testing lab
7. Building design
8. Justification
9. Generation of electricity
1. Atomic Structure
During this step, our class looked at how atoms work. The basic information from this was how protons, electrons, and neutrons develop an atom. We needed this information to learn about how atoms make up everything in our world.
Nucleus- the center part of an atom.
Isotope- an atom with an unusual number of neutrons
Ion- an atom with an unusual number of electrons
2. Designing a Hot Water Heater
This step in the project was about how we could use the suns energy to do many tasks. Our task was to build a fully functional solar water heater. My group used the recommended guidelines with some twists to make the heater. The parts it was broken into were a water container, a s-shaped copper tube, a shoe box, and a catching glass. It worked by feeding the water through the copper tube into the catching container and cycling it through. We ran it for 20 minutes and got a result of a 3 degree Celsius increase.
We learned about the equation for heat gain. Our heat gain in the solar heater was 11,302 Joules. This was a good amount of increase because we had a lot of water.
3. Solar Angles
This part of the project was necessary for the later parts of this project. We learned about how the suns angle changes throughout the seasons. Here is a diagram that shows the sun throughout the year
4. Daylighting Design
This step educated us on how to make a house that would get great amounts of sunlight. We had to build a model of a house made by my group with four daylighting techniques. These are the things we had to include in our house
Skylights- a window cut into the roof that allows light to travel inside the building
Light shelf- a window sill that reflects incoming sun rays onto the ceiling and then into the room
Solar tube- a highly reflective tube that brings daylight into a home by bouncing the light through the tube
Clerestory window- a window placed close to the ceiling on the walls, used to bring slanted light into the room
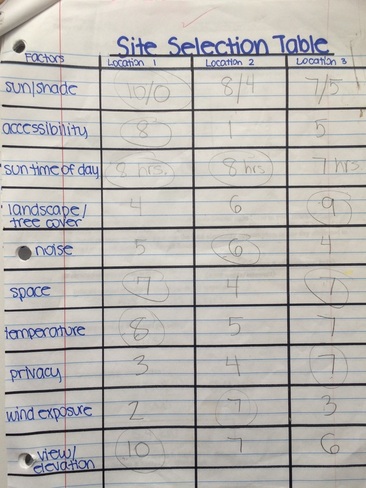
5. Site Selection
This was a very fun part of the passive solar home project. Our task was to walk around the San Marin campus and find theoretical locations to build a home. My group inspected 3 locations. We judged the locations quality by looking at sun/shade, accessibility, amount of sunlight you get in the day, landscape/tree cover, noise, space, temperature, privacy, wind exposure, and view/elevation. We chose the first sight we looked at. Here is a table of the locations based on scales of 1-10
This step educated us on how to make a house that would get great amounts of sunlight. We had to build a model of a house made by my group with four daylighting techniques. These are the things we had to include in our house
Skylights- a window cut into the roof that allows light to travel inside the building
Light shelf- a window sill that reflects incoming sun rays onto the ceiling and then into the room
Solar tube- a highly reflective tube that brings daylight into a home by bouncing the light through the tube
Clerestory window- a window placed close to the ceiling on the walls, used to bring slanted light into the room
5. Site Selection
This was a very fun part of the passive solar home project. Our task was to walk around the San Marin campus and find theoretical locations to build a home. My group inspected 3 locations. We judged the locations quality by looking at sun/shade, accessibility, amount of sunlight you get in the day, landscape/tree cover, noise, space, temperature, privacy, wind exposure, and view/elevation. We chose the first sight we looked at. Here is a table of the locations based on scales of 1-10
6. Materials Testing
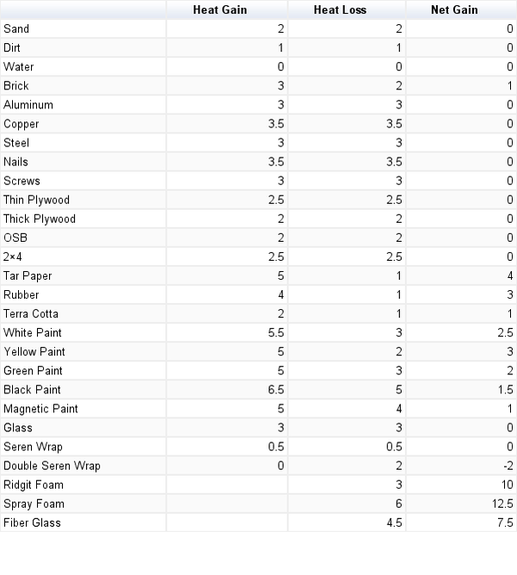
In this step, our STEM class learned about how different materials insulated, conducted, and sustained heat. We tested a total of 27 materials. They were split up into categories of conducting, insulating, and sustaining heat. We tested for these aspects by putting them under a 60 W light bulb for 20 minutes. Then, we would turn off the light bulb, take the temperature and take their temperature again after 20 minutes of cooling time. Our class figured out that spray foam had the highest net gain of temperature. Below are all the materials we tested.
In this step, our STEM class learned about how different materials insulated, conducted, and sustained heat. We tested a total of 27 materials. They were split up into categories of conducting, insulating, and sustaining heat. We tested for these aspects by putting them under a 60 W light bulb for 20 minutes. Then, we would turn off the light bulb, take the temperature and take their temperature again after 20 minutes of cooling time. Our class figured out that spray foam had the highest net gain of temperature. Below are all the materials we tested.
7. Building Design
This step of the project took the longest. My group and I learned what is was like to make and build something with no instructions or guidelines. The point of this step was to figure out a design of a cold-frame to put in the school garden and a design of a reflector panel used to get more light into the northern window of the solar studio. We worked very hard on these and had to present them to judges. Here are the presentations of our ideas.
This step of the project took the longest. My group and I learned what is was like to make and build something with no instructions or guidelines. The point of this step was to figure out a design of a cold-frame to put in the school garden and a design of a reflector panel used to get more light into the northern window of the solar studio. We worked very hard on these and had to present them to judges. Here are the presentations of our ideas.
8. Justification
In this step, our class created one Google Doc and compared and contrasted lots of different types of energy. Here is the Doc:
In this step, our class created one Google Doc and compared and contrasted lots of different types of energy. Here is the Doc:
9. Generation of Electricity
In the final step of this project, our class looked at different types of wind energy
In the final step of this project, our class looked at different types of wind energy
